Prerequisites
Before connecting the Thrust MCP server, you’ll need:- A Thrust account at demo.onthrust.com
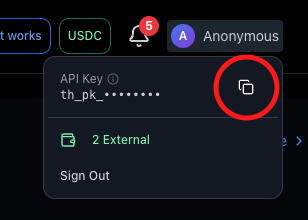
- Your API key (see Getting Your API Key)
- An MCP-compatible AI assistant (Claude Code, Claude Desktop, ChatGPT, Cursor, or Windsurf)
Getting Your API Key
Visit Thrust Platform
Go to demo.onthrust.com and sign in
Keep your API key secure! It provides access to your Thrust account and can execute transactions on your behalf.
Claude Code
Claude Code is Anthropic’s official CLI tool. Add Thrust with a single command:Run Installation Command
Open your terminal and run:Replace
YOUR_API_KEY with your actual API key from demo.onthrust.comExample Usage
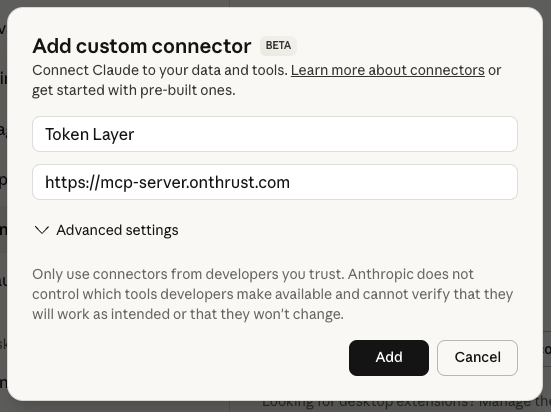
Claude Desktop
Claude Desktop supports MCP through a visual connector interface:Visual Guide


ChatGPT
ChatGPT supports custom MCP connectors through a similar interface:The OAuth flow for ChatGPT is identical to Claude Desktop - you’ll authenticate with Thrust and authorize the connection.
Cursor & Windsurf
Cursor and Windsurf are AI-powered code editors with MCP support:Configuration
Alternative: Config File
You can also add the MCP server via config file:Testing Your Connection
Once connected, try these commands to verify everything works:Troubleshooting
Authentication Failed
Authentication Failed
- Verify your API key is correct
- Check that you copied the full key without extra spaces
- Try generating a new API key from demo.onthrust.com
Connection Timeout
Connection Timeout
- Ensure you have internet connectivity
- Check if https://mcp-server.onthrust.com is accessible
- Try again in a few minutes (may be temporary server issue)
Tool Not Found
Tool Not Found
- Verify the MCP server is properly configured
- Restart your AI assistant
- Check the Tools Reference for available tool names
Transaction Failed
Transaction Failed
- Ensure you have sufficient balance for gas fees
- Check that you’re using the correct network (mainnet vs testnet)
- Review transaction details before confirming
Security Best Practices
Protect Your API Key
Never share your API key or commit it to public repositories
Review Permissions
Understand what actions the MCP server can perform on your behalf
Monitor Activity
Regularly check your transaction history on demo.onthrust.com
Revoke Access
You can revoke API keys anytime from your account settings